Warp Drive Propellers, Replacement Blades, Blade Options on Sale this Month!
Click Here For Warp Drive Aircraft Propellers
Click Here For Warp Drive Airboat and Hovercraft Propellers
Setting Blade Pitch Using
The Warp Drive Professional Protractor
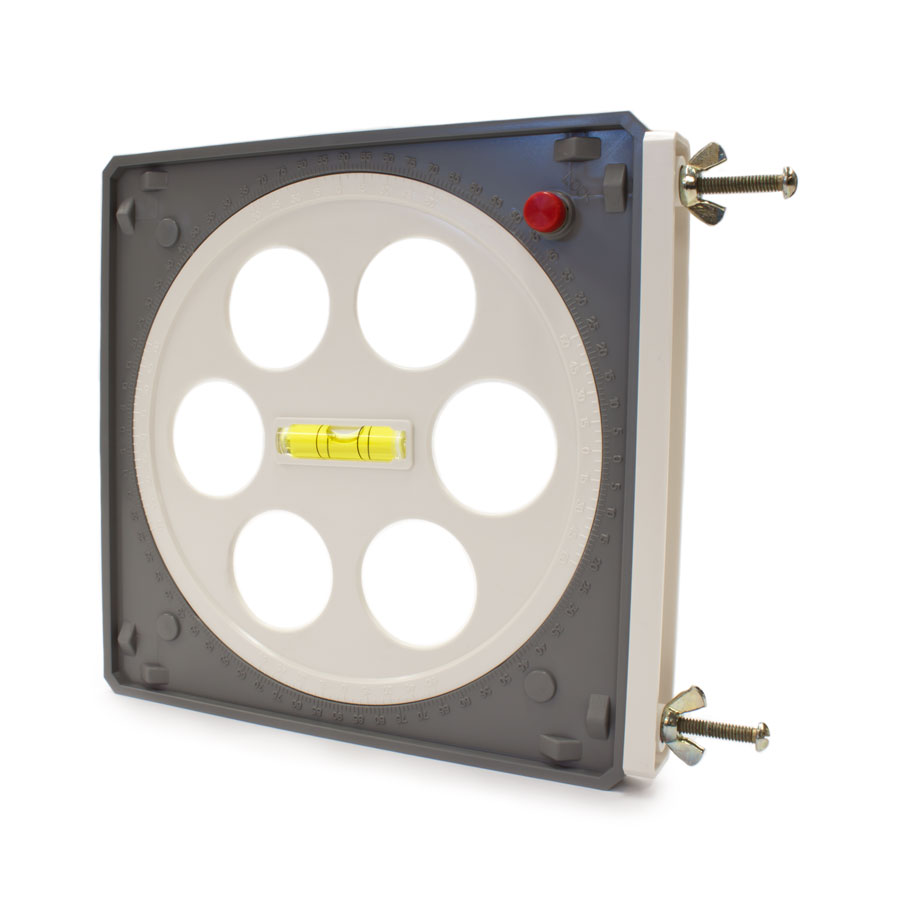
SET PROPELLER PITCH WITH THE PROTRACTOR ATTACHED AT THE PROPELLER TIP.
The Warp Drive Protractor was designed after the professional prop protractors used by A&P mechanics. When used properly, this protractor can help you set the pitch of your blades to within a 1/4 of a degree. It can also be used for a variety of applications such as wing surfaces, flaps, tail surfaces or anything needing to be measured in degrees.
The outer scale on the protractor is marked out in one degree increments. The only number you will use on the inner scale is the zero on the white wheel. The white bar on the side of the protractor is for clamping to the blade using the two wing nuts. The red knurled knob is for locking the white wheel in place. This will prevent the wheel from moving as you are changing from blade to blade.
1. Determine the Starting Point. There are two ways of determining your initial starting point. One is to position the aircraft so that the hub of the prop is vertical or perpendicular to the ground. For example, if you have a tail-dragger aircraft, raise the tail until the hub is vertical. The other way is to simply take a reading at the prop hub to determine how many degrees from vertical the aircraft is sitting. Either way is fine.
On a tractor aircraft you would hold the white bar side of the protractor in your hand and place the opposite side of the protractor against the hub and rotate the wheel until the bubble is centered. On a pusher you would place the white bar itself against the hub. You may also remove the top bolt with the wing nut to let the white bar swing down, then place the protractor itself against the hub.
2. Setting Blade Pitch. Determine how many degrees of pitch you want in your propeller, then rotate the center wheel that many degrees from your initial staring point. For example, if your aircraft is sitting level and you want ten degrees of pitch in the prop, rotate the center wheel until the white 0 lines up with the 10 on the outside scale. Likewise, if your aircraft is not sitting level, take your reading at the hub then rotate the center wheel 10 marks from this reading. This will give you the ten degrees difference from the hub to the tip of the blade. After rotating the center wheel for your pitch, attach the protractor to the tip of the blade. The body of the protractor should be against the back, flat side of the blade while the white bar should be on the front side.
Next, simply rotate the blade until the bubble is centered. You will also want to pull out on the blade as you are setting the pitch so you make sure the collar is fully seated in the hub. After you have rotated the blade and centered the bubble, tighten the clamping bolts slightly. Do not take to full torque yet. You will want to leave the protractor clamped to the tip of the blade while you are torquing the bolts to make sure the pitch is not changing while you tighten. If it does, simply move in a criss-cross pattern while you torque to keep the bubble centered. When you have the first blade set and partially torqued, lock the center wheel with the red knurled knob, remove the protractor, rotate the next blade into the same position, mount the protractor and follow the same setting instructions. The position of the blade while setting the pitch does not need to be perfectly horizontal with the ground, as long as when you bring the next blade around, it is in the same position as the first. Once you have set all blades for pitch, then go back around and tighten the clamping bolts to full torque value, again watching the bubble as you tighten.
Propeller Bolt Torque Values--All Standard, HP and HPL hubs that use 1/4" bolts to clamp the blades in the hub should be tightened to 120 inch pounds. All Rotax bolt patterns that use 8 mm bolts to mount the prop to the gear box flange should be tightened to 175 inch pounds. All Standard, HP and HPL hubs that use 3/8" bolts to mount the prop should be tightened to 35 foot pounds. Warp Drive propeller installations on direct-drive aircraft engines and other engines used on airboats must tighten the 5/16" clamping bolts to 200 inch pounds and tighten the 1/2" flange mounting bolts to 60 foot pounds. Adherence to these torque values is imperative for reasons of safety. |
Copyright 2000-2019
Warp Drive Propellers Blade Pitch Setting Warp Drive Professional Protractor Warp Drive professional protractor use to set your propeller blades within 1/4 of a degree blade pitch accuracy Use to check wing surface angles on your aircraft Warp Drive warp drive professional protractor protractor angle finder aircraft propellers airboat propellers propeller warp drive props warpdrive warp drive propellers warp drive prop